You'll notice a difference in the shade of the green cs from the beginning to the end of the pictures. This is because the first set of pictures were taken during the day and the darker ones at night.
With the 4 1/4" x 8" piece of cs positioned short side at the top, score at 1" and 3 1/4". Turn cs length wise and score at 2", 3", 5" and 6" and it will look like the first picture on the left below. The instructions talk about using a ScorPal but of course you can scor the cs in any way. Next, cut off the outer strips to 3" on one end of the cs, creating the box flap. Use a bone folder to make additional creases along the score lines, as seen in the second picture below. The third picture shows the cuts made at the 1" score lines on both sides.


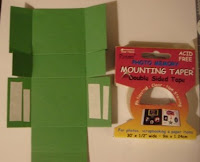
The next step is to add strips of double sided tape to the box flaps as shown below. I used double sided Mounting Tape instead of Scor-Tape as mentioned in the instructions, because it's what I had on hand. Flip the cs over and add ds tape to the 1" tabs as shown in the second picture below. If you're going to stamp the cs, instead of wrapping the box in cs, you should do the stamping now. Make sure to stamp all over the box including the flaps too. The third picture below shows the inward fold of the 1" tabs and the ds tape on the 2" strips.


You're getting close to the end so hang in there. These mini boxes really don't take that long to make, it just seems like it because of the length of the instructions. Once you get the hang of it make a few at a time so you always have some to use for various occasions.
I got off track, let's continue...remove the ds tape liner from the 2" strips and bring the sides together on the outside to form the box. Press firmly along the inside to reinforce the taped tabs. Cut 1" off the box flap. The instructions leave the box flap square, I cut the two sides at an angle as shown below in the second picture, then it's not so boxy! Make a closure for the front of the box. I used the square scallop punch with green cs and I cut out a few shamrocks I stamped with green ink on white cs. As shown in the third picture below, flip the closure over and attach 2 dimensionals near the bottom. I then cut a small strip of Velcro and attach it near the the top of the closure. The Velcro will secure the box flap to the box so the inside contents (candy in my case) don't fall out, it's a little extra security.


I attached Ric Rac with glue dots to the box and here is the finished product.

Don't know how many instructions I'll be posting, I feel like I'm too wordy. Let me know if you have any questions or comments. I would appreciate any feedback, positive or negative. Thanks.


you DAZZLE me :) the boxes are awesome, and I may get around to trying out your instructions soon, lol. I don't get to do much paper fun at home... only at Ellen's!
ReplyDeletethanks...you should come to Ellen's when you have a few hours to yourself (yeah right!) and we can craft. It would be fun :o)
ReplyDelete