Wow I can't believe it's been almost 2 months since I blogged, I'm ready to get back in the swing of things now that I've finished moving.
I spent a year looking for a paralegal job in the Central Valley and though I was close to finding a job and even got a verbal offer that was rescinded, I decided to relocate back to the Bay Area. I have a better chance of finding a paralegal job here even though there are more people looking for a job.
With the holidays, laptop issues, packing and other situations to deal with, December 2009 flew right by. On January 9th, 2010 I arrived at my friend Jerrold's in SF with Luna (my 8 month old cat) and my van packed with stuff. I think most of the stuff in my van was for Luna :o) Jerrold is letting me stay with him rent free for 6 weeks so I have a home base to work from. It's very sweet of him to do this for me, he is a great friend.
I got a new phone and computer within the last week, they both decided to go dead on me at the same time. There were 2 days last week where I didn't have a phone or computer and I must say I felt very isolated because I didn't have an immediate way to connect with anyone.
With each passing week there seems to be more jobs here which is a sign to me that I made the right decision to move back here.
I hope to be getting back to my crafting within the next month or two so stay tuned...
Thursday, January 28, 2010
Wednesday, December 9, 2009
Snow in Coarsegold
I'm dog sitting for some friends here in Coarsegold and on December 7th it snowed!! I was like a kid outside taking pictures, my hands were freezing but I was having so much fun I didn't think about how cold it really was. We got a total of about 2" in a few hours.
It was like a winter wonderland and so beautiful. Here are a few of the pictures I took of the snow.


The picture below is of the center of the patio table. It's iron lattice work and I like the pattern so I took a picture. I think there is a card in this design somewhere.

The dog below named Luna loved playing in the snow :o)

The snow on the chicken wire was another pattern I liked.

One of the many great things about living in Coarsegold is that when it snows it's usually only a few times a year, if that, and only a few inches at a time.
Thursday, November 26, 2009
More Christmas Cards!
Here are some more Christmas cards I made and I must say I really had alot of fun making them. The first two cards are using the same elements and shows how it changes the look of the card by putting the elements on an angle. I embossed the red mittens though it may be hard to see in these pictures.

Actually I used the ice blue brads on this second card and not on the first card.

As you can tell I was really into using my embossing inks. I like the simplicity of this white embossed tree card. I was a bit disappointed that the white embossing ink isn't more pronounced, maybe it's because I used clear instead of white powder to emboss with?
To make the white flower on the lower right hand side of the tree, I stamped the tree in red ink on white cs and cut it out. I applied it with a glue dot since it had to adhere to the white embossed ink. I used white half pearl for the center of the flower and the smaller half pearls around each ticket punched corner. To put the bow at the tree trunk I used an x-acto knife to cut two slits, one on either side so the white ribbon slides right through to tie it. I did practice this before I did it on this card, I wanted to make sure it would work like I thought.

I like cards that are simple to make, you can make quite a few in a short amount of time. I love this mitten background paper, it's so colorful.

This is one of my favorite cards from this batch I made and it's very easy too. Using olive green ink I used the French Script stamp on vanilla cs and then stamped the tree using mahogany ink. I put a clear brad at the top of the tree and inked the edges with the mahogany ink.
I've had the mitten stamp for a year or so and have always wanted to use embossing ink and powder for a card. I used the small and large tag punches and a silver eyelet at the top of the tag punch so I could put ribbon through it.

Here is a closer picture of the mitten tags, hopefully you can see the embossing better.

Happy Holidays everyone!

Actually I used the ice blue brads on this second card and not on the first card.

As you can tell I was really into using my embossing inks. I like the simplicity of this white embossed tree card. I was a bit disappointed that the white embossing ink isn't more pronounced, maybe it's because I used clear instead of white powder to emboss with?
To make the white flower on the lower right hand side of the tree, I stamped the tree in red ink on white cs and cut it out. I applied it with a glue dot since it had to adhere to the white embossed ink. I used white half pearl for the center of the flower and the smaller half pearls around each ticket punched corner. To put the bow at the tree trunk I used an x-acto knife to cut two slits, one on either side so the white ribbon slides right through to tie it. I did practice this before I did it on this card, I wanted to make sure it would work like I thought.

I like cards that are simple to make, you can make quite a few in a short amount of time. I love this mitten background paper, it's so colorful.

This is one of my favorite cards from this batch I made and it's very easy too. Using olive green ink I used the French Script stamp on vanilla cs and then stamped the tree using mahogany ink. I put a clear brad at the top of the tree and inked the edges with the mahogany ink.

I've had the mitten stamp for a year or so and have always wanted to use embossing ink and powder for a card. I used the small and large tag punches and a silver eyelet at the top of the tag punch so I could put ribbon through it.

Here is a closer picture of the mitten tags, hopefully you can see the embossing better.

Happy Holidays everyone!
Friday, November 13, 2009
Organization of My Craft Space
I just realized that in my August 19th post titled My Craft Space - Before and After, I said I would post pictures once I got all my craft products put away and organized.
I finished organizing everything a few weeks ago and what really got me started was organizing my card stock into basic colors. I used to spend so much time looking through my cs for colors it was getting frustrating for me. Now I can find the colors I want very easily.

This is my general work space with the craft table and all my inks, ribbons, pens, buttons, etc. are on my craft table. I really like the way it turned out and think I used the space wisely.

Here is a close up of the area with Tim Holtz Distress Inks, powders and crackle paint. I got the little pails you can see on the right hand side at Target for $1.00. I have the green Jingle Bell gift bag visible to remind myself to make a few this year instead of buying them. It adds another personal touch to gifts and is really quite simple once you look at how it's constructed.

When I was looking through all my craft stuff and deciding what I wanted to keep and give away, I came across a label maker. I went to town using it as you'll see in the pictures below.

The square pink apple container is also from Target for $1.00 and I used it for my embossing powders. The small pails and square containers are great for pens, embellishments and other small craft things you want to keep within reach. And the price is right!

The only thing I bought was the 3 drawer cart which holds my ribbons, punches and craft accessories. Of course I labeled the drawers, that label maker was fun to use, who knew.

All the stamps I've kept here with me in the cottage are stored in plastic bins. The rest are in storage. This is the first time ever I've organized my craft space and it makes me wonder why I never did it before. I've done it now and am very very happy with it :o)
Now it's time to continue stamping holiday cards.
Thursday, November 5, 2009
Owl Christmas Cards
I've started making Christmas cards now so I wanted to share the first few I've made. My Aunt Carol has always loved owls so I wanted to start off making my Christmas cards for her. I got this Christmas Owls stamp set from My Favorite Things http://www.mftstamps.com/ in their Bubble Bin, which are products at a discount. Not only do I love the main owl stamp but the two sentiments are cute too, Owl be home for Christmas and Hope your holidays are a hoot!
I stamped the owls and ornaments with black ink and hand painted the owls, hats and ornaments in various color combinations. Since I hand painted these cards I decided to use a sealer so the colors don't fade over time. I used Krylon Workable Fixatif which is good when using paints, pencil, pastels, charcoal, etc.
For the first card I used blue, red and white cs. I stamped the blue cs with a snowflake using Versamark. This product is what gives the background of the card a watermark feel. I have a small star punch which I decided to use around the sentiment of the card. I think it ties together nicely with the star ornaments.

With all the white parts of the owl hats on these cards I used a 2 Way Glue Pen. To the parts I wanted sparkly I used the glue pen, then sprinkled the glitter on top and tapped it off. You say see the glitter hats better on this close up picture.

For this next card I used red yellow, blue and white cs. I used a frame punch on the four corners of the yellow cs. I also used the photo corner punch on the red and yellow cs. The red photo corner is at the bottom right of the white owl cs and the yellow one is at the bottom right of the sentiment. I must admit that when I first saw this punch in various classes I took I didn't think it would be one that I would use. But I like using it because it gives just a hint of a different color where ever it's used.

Here is the third card I made using pink (one of my favorite colors), grass green and white cs. I used a crimper to get the ripple effect on the pink cs. These are non-traditional Christmas colors but I like the color combinations.

I'll be making more cards in the next day or two and will be trying new techniques too so stop by again soon.
Pat Me on the Back
I was looking at other peoples crafting projects on their blogs and have seen some with slideshows of their craft projects. I like that feature because it shows the various cards and other projects I've made over the last year or two. Since I've only been blogging since February of this year the slideshow gives visitors a chance to see more projects I've made, other than what I've blogged about.
I attempted and succeed (Yeah!!) to add a slideshow of my cards to my blog. I was getting a bit frustrated in the beginning because the width of the slideshow widget was too wide for my blog column so I needed to figure out how to get the appropriate size. With a little research and alot of patience I found the information I needed and voila, I did it!!
I am not a techee so it tends to take me a little longer to figure things out but I did, so pat me on the back!!
Wednesday, October 21, 2009
Itty Bitty Accordion Card
When I have extra time in Fresno I enjoy going to Borders to browse the craft magazines to see what's new and get ideas. A few months ago I picked up the Stampers' Sampler Take Ten, Summer 2009 magazine and saw a feature about Itty Bitty Accordion cards and have wanted to make one ever since. My girlfriend Divina's 40th birthday is in November and so I decided to take on the challenge and make one for her. I'll definitely be making more of them!
I am pretty happy with the finished product pictured below and learned alot during the whole process.

Since the article didn't give any instructions, besides the various sizes of the panels of the cards shown, I had to figure out how to configure and attach the panels to make the accordion and how to close the accordion to make the card presentable.
I knew I wanted the word "birthday" inside so I needed 8 panels for the letters, 1 panel for the front and 1 panel at the back of the card to write a birthday sentiment. I needed a total of 10 panels and the size I chose for each panel is 2 3/4" (Now I know why they didn't include instructions, this is proving very difficult to explain!). I made a total of 3 segments, scored at 2 3/4" and bent the appropriate way to form the accordion.

Since it was my first time making this card I found it helpful to draw out my concept of the panels. I am a visual person and it helped me formulate what I wanted my card to look like. I then started decorating the 8 panels using the french script stamp, green embossing ink, clear powder and the embossing heat tool. Embossing is what gives the french words the shine you can see. I put a post it on the first and last panels to remind myself not to emboss them, I'll be decorating them later.

Each "birthday" letter was stamped in Rose Red, alternating Pretty in Pink and Rose Red solid cs. I then used the french swirl and postmarks stamps with green ink and stamped around the letter. I attached the solid cs to the patterned paper. I used the ticket corner punch on both the the solid and pattered paper before adhering them together.

The picture the below is a close-up of the end of the card with the last panel left blank for the birthday sentiment.

Here are the 3 segments after I decorated them (the picture quality isn't too great).

Next I decorated the front panel, first stamping the background with green ink and the french swirl and postmark stamps. The 4 and 0, exclamation point, crown and hearts are all Tim Holtz Grungeboard products "painted" with his Distress Crackle Paints. I added the silver heart charm to the crown attaching it with a silver jump ring. I closed the itty bitty accordion card using a clip and to make it more feminine I tied white and rose red ribbons on the clip.
Here is what it looks like laid out as the accordion card. Unfortunately I don't have a nice mantel or bookshelf to display it on but I worked with what I had using my craft table. It turned out pretty good for my first try!

Thanks for taking a look. It's great to be crafting and blogging again!
Tuesday, October 20, 2009
Addition to my family
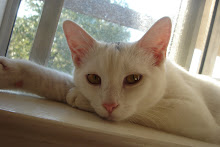
I adopted a kitten on September 26th, her name is Luna and she was 4 months old. She is a domestic short hair and is white almost all over her body except for the splash of gray on top of her head. Her eyes are the most beautiful golden color, one of the things that attracted her to me when I first saw her at Pet Smart.
This is my first time owning a cat, we grew up with dogs because my dad is allergic to cats. After being around my friends cats the last few years I've grown to like them and see that they do have personalities of their own and can be affectionate like dogs, just in a different way.

One of her favorite games is for me to roll the ball into the paper bag and I say "get the ball". Instead of just going in the bag and getting the ball she walks around it and paws the sides and back of the bag before she jumps in to get the ball. It makes me laugh every time she does it!!


Since I moved out to the country to a cottage, this is the perfect environment for Luna to have birdie TV. All she has to do is look out the various windows and she sees many types of birds flying about. One of her favorite spots to look for birds in the morning is the bathroom window because she can get so close to them. In the afternoon the same window provides a great sunny place to take a nap, as seen in the picture below.

A great closeup of those gorgeous golden eyes.

Of course sleeping is a big part of her day too, she is a cat after all!

I can't believe I've only had Luna one month, it seems like I've had her for a few months at least. She is a sweetheart (most of the time!) and I am so glad that I adopted her.
Subscribe to:
Posts (Atom)