Friday, March 20, 2009

Baby Announcements

I'll be making baby announcements for Darcy and Gary as a gift for their baby girl Ruby who is due mid-March. I made the baby announcement below for my other friends and really had alot of fun making it.

This card is 6 1/2" x 5" of Sahara Sand cs. There is a 2 1/2" strip of Brocade Blue cs. I cut a 2" strip of dot paper and tore the upper and lower edges. I attached the two strips of paper together and tied 1/4" bluebird grosgrain ribbon around the two strips. The baby hand stamp is from the SU set I'm Here. It's stamped on white cs and I sponged around all four sides. It's attached to a square piece of brocade blue cs. I took a small safety pin and alternated white and blue beads and to attach it to the square I taped it to the back of the brocade blue cs. I used dimensional's to attach it to the Sahara Sand cs. M-A-R-C-O is randomly stamped in the lower right hand side of the Sahara Sand card stock.

The inside of the announcement measures 5 3/4" x 4". I used a corner stamp to add a little decoration and printed the birth information on vellum paper on my printer.

I can't wait to do the baby announcements for Darcy and Gary since it will be for a girl. I spoke with Darcy about color combination's she likes and I have some design ideas so it should be fun.

Tuesday, March 17, 2009

English Mastiff's...BIG Dogs

I went to Ellen's consignment shop in downtown Clovis today to meet her sister Sharon before she went back home to Benicia. She was in town to visit with her sister Ellen. Here is a picture of the two sisters, Ellen is on the right and Sharon is on the left, great picture!Sharon brought her two English Mastiff's with her and they had alot of fun visiting Ellen and her husband Patrick in Coarsegold. The tan dog is Louie who is 180 pounds and the black one is Ella who weighs 150 pounds. They're both 5 years old and big teddy bears, not what I thought when I first meet them. Being the fearless dog lover I am, I went out to the car to visit them and Louie was barking a pretty ferocious bark. When Sharon came out to the car and they realized I was ok they were wagging their tales and lapping up the attention. It's their size that is intimidating which is hard to see in these photo's.
As you can imagine it was difficult to get both Louie and Ella to sit still enough for Bill to take a few pictures. I think they did pretty good...can't wait to see them and Sharon again!!

Monday, March 16, 2009

Pictures from a day in the country

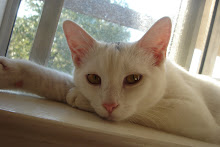
Yesterday I went to Coarsegold to visit some friends, on a beautiful sunny day. When I arrived at their house and got out of the car I saw a cat tail hanging off of a chair in the cat "compound". I knew it was Duncan lounging in the sun. Here are a few pictures...
Isn't he a cutie? He has a little brother named Buddy who is a little more feisty and likes to nap in the closet. They're both beautiful Abyssinian cats and alot of fun to be around.

I took a walk around my friends property and snapped a few pictures of wildflowers in bloom...

It's so beautiful and peaceful up in Coarsegold, I love to visit my friends there.

Saturday, March 14, 2009

Wish Upon A Hero Website

On one of those rare occasions I watched ABC News with Charlie Gibson last night, I caught their Person of the Week segment. They featured an organization called Wish Upon A Hero and I was so impressed with their idea I wanted to share it.

"Everyone can help anyone" is their motto. As stated on their website "Wish Upon A Hero is a unique venue for any individual, organization, or company looking to make a difference in someone’s life, or the lives of countless people. Heroes come in all ages and from all walks of life. All of us, from our nation’s most powerful corporations to individual philanthropists, and those with limited financial means, can be someone’s hero."

This is a one of a kind service designed to connect those in need with people that can truly change their lives. You can be the one to grant a wish and/or the one to make a wish.

Giving to others is one of life's biggest rewards.

Check out their link on my blog.

Friday, March 13, 2009

2 More Mini Box's

Here are two more mini box's I made for friends. I like to stamp the boxes versus using cs, I feel more creative that way and I can use ribbon too!

Instructions for Mini Box's

Here are some pictures and instructions of how to make the mini boxes. I got the idea from SplitCoastStampers website (http://www.splitcoaststampers.com/resources/tutorials/ghirardellibox). I followed their instructions for the most part but did a few things a little different, which I'll write about here.

You'll notice a difference in the shade of the green cs from the beginning to the end of the pictures. This is because the first set of pictures were taken during the day and the darker ones at night.

With the 4 1/4" x 8" piece of cs positioned short side at the top, score at 1" and 3 1/4". Turn cs length wise and score at 2", 3", 5" and 6" and it will look like the first picture on the left below. The instructions talk about using a ScorPal but of course you can scor the cs in any way. Next, cut off the outer strips to 3" on one end of the cs, creating the box flap. Use a bone folder to make additional creases along the score lines, as seen in the second picture below. The third picture shows the cuts made at the 1" score lines on both sides.


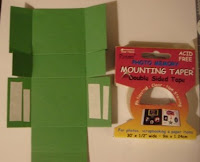
The next step is to add strips of double sided tape to the box flaps as shown below. I used double sided Mounting Tape instead of Scor-Tape as mentioned in the instructions, because it's what I had on hand. Flip the cs over and add ds tape to the 1" tabs as shown in the second picture below. If you're going to stamp the cs, instead of wrapping the box in cs, you should do the stamping now. Make sure to stamp all over the box including the flaps too. The third picture below shows the inward fold of the 1" tabs and the ds tape on the 2" strips.

You're getting close to the end so hang in there. These mini boxes really don't take that long to make, it just seems like it because of the length of the instructions. Once you get the hang of it make a few at a time so you always have some to use for various occasions.

I got off track, let's continue...remove the ds tape liner from the 2" strips and bring the sides together on the outside to form the box. Press firmly along the inside to reinforce the taped tabs. Cut 1" off the box flap. The instructions leave the box flap square, I cut the two sides at an angle as shown below in the second picture, then it's not so boxy! Make a closure for the front of the box. I used the square scallop punch with green cs and I cut out a few shamrocks I stamped with green ink on white cs. As shown in the third picture below, flip the closure over and attach 2 dimensionals near the bottom. I then cut a small strip of Velcro and attach it near the the top of the closure. The Velcro will secure the box flap to the box so the inside contents (candy in my case) don't fall out, it's a little extra security.


I attached Ric Rac with glue dots to the box and here is the finished product.


Don't know how many instructions I'll be posting, I feel like I'm too wordy. Let me know if you have any questions or comments. I would appreciate any feedback, positive or negative. Thanks.

Thursday, March 12, 2009

St. Patrick's Day Mini Box

Here is the St. Patrick's Day mini box I made for Aunt Carol to send with the card I made her, shown in my previous post.

I got three of these Ghirardelli Chocolate Squares into the box, I think it's so cute. Of course anything small is cute to me!


I took a ton of pictures while I made the box so tomorrow I'll post pics and details of how I made it.

Wednesday, March 11, 2009

St. Patrick's Day card

I just finished making this St. Patrick's Day card for my Aunt Carol who lives in Texas. The holiday has alot of meaning for her since she lived in Ireland for many years.

This card came together for me using supplies from various sources. My favorite store to get paper and ribbon is Pocketful of Treasures (http://www.pocketfuloftreasures.com) here in Clovis, only 2 blocks from me!! They have a great selection of ribbon and ds paper and the staff is always friendly and helpful.

I got the stripped background paper and silver brads at PFOT. The heart stamp is from SU and part of a set called Polka Dot Punches. My stamping buddy Ellen (who BTW has a great consignment shop http://www.allofmeconsignments.com/) used the heart stamp with green ink on white cs. She then used the Full Heart punch to make the hearts. Ellen stamped and punched a total of 9 hearts for me, what a stamping buddy :o) To make the stem for the clover I used the "extra" hearts to cut them out. I cut a total of two hearts until I got a stem I liked, it was well worth it.

This is the first time I used this sentiment and it won't be the last, I really like it. I used one of the SU clips and the white Dress Up Ribbon. I was set to get ribbon at PFOT and took one last look at my ribbon stash and saw the DUR. I took a close up picture of the ribbon to show the texture which is more like cotton. It's very lacy looking and it adds another Irish dimension to the card. It actually reminds me of lace curtains we had when we lived in Europe during my teenage years. I'll definitely be getting more of this SU ribbon.

I don't always decorate the inside of cards but decided to with this one because my Aunt is very special to me. It's simple but I like it that way. To make the background I used the crimper on light green cs. I then used the Celtic border stamp with light green ink on white cs. I was very nervous using this stamp because I had to stamp all four corners separately, hoping that they would all line up. They did and next time I'll feel more confident.

There were alot of firsts for me on this project and I really enjoyed using stamps and accessories for the first time. I tend to hoard them instead of use them which defeats the purpose of having them in the first place. So the making of this card was a step in the right direction...

Sunday, March 8, 2009

Blast from the past

So I finally finished looking through 3 boxes (about 50 years) worth of pictures and got them whittled down to one box of pictures. I had alot of fun looking at places I've been and people I've known over the years. I'll be sharing some of the pics from time to time here on my blog.

My first paralegal job was with the Sedgwick Detert law firm in San Francisco. It was also my first job working in a "big" city so I was excited and having alot of fun!! These 3 pictures were taken at a friends house before we all went to the Sedgwick Christmas party in SF. I call this picture Jerrold's Herem.

This second picture is of us three gals, me, Sally and Melissa. I was trying to act sexy but Sally had the pose down perfectly...


I love this picture with Sally doing the Saturday Night Fever pose in her gold metallic dress. This is a classic picture...


Fun fun fun...hope you enjoyed them!!