I was looking at other peoples crafting projects on their blogs and have seen some with slideshows of their craft projects. I like that feature because it shows the various cards and other projects I've made over the last year or two. Since I've only been blogging since February of this year the slideshow gives visitors a chance to see more projects I've made, other than what I've blogged about.
I attempted and succeed (Yeah!!) to add a slideshow of my cards to my blog. I was getting a bit frustrated in the beginning because the width of the slideshow widget was too wide for my blog column so I needed to figure out how to get the appropriate size. With a little research and alot of patience I found the information I needed and voila, I did it!!
I am not a techee so it tends to take me a little longer to figure things out but I did, so pat me on the back!!
Thursday, November 5, 2009


Wednesday, October 21, 2009
Itty Bitty Accordion Card
When I have extra time in Fresno I enjoy going to Borders to browse the craft magazines to see what's new and get ideas. A few months ago I picked up the Stampers' Sampler Take Ten, Summer 2009 magazine and saw a feature about Itty Bitty Accordion cards and have wanted to make one ever since. My girlfriend Divina's 40th birthday is in November and so I decided to take on the challenge and make one for her. I'll definitely be making more of them!
I am pretty happy with the finished product pictured below and learned alot during the whole process.

Since the article didn't give any instructions, besides the various sizes of the panels of the cards shown, I had to figure out how to configure and attach the panels to make the accordion and how to close the accordion to make the card presentable.
I knew I wanted the word "birthday" inside so I needed 8 panels for the letters, 1 panel for the front and 1 panel at the back of the card to write a birthday sentiment. I needed a total of 10 panels and the size I chose for each panel is 2 3/4" (Now I know why they didn't include instructions, this is proving very difficult to explain!). I made a total of 3 segments, scored at 2 3/4" and bent the appropriate way to form the accordion.

Since it was my first time making this card I found it helpful to draw out my concept of the panels. I am a visual person and it helped me formulate what I wanted my card to look like. I then started decorating the 8 panels using the french script stamp, green embossing ink, clear powder and the embossing heat tool. Embossing is what gives the french words the shine you can see. I put a post it on the first and last panels to remind myself not to emboss them, I'll be decorating them later.

Each "birthday" letter was stamped in Rose Red, alternating Pretty in Pink and Rose Red solid cs. I then used the french swirl and postmarks stamps with green ink and stamped around the letter. I attached the solid cs to the patterned paper. I used the ticket corner punch on both the the solid and pattered paper before adhering them together.

The picture the below is a close-up of the end of the card with the last panel left blank for the birthday sentiment.

Here are the 3 segments after I decorated them (the picture quality isn't too great).

Next I decorated the front panel, first stamping the background with green ink and the french swirl and postmark stamps. The 4 and 0, exclamation point, crown and hearts are all Tim Holtz Grungeboard products "painted" with his Distress Crackle Paints. I added the silver heart charm to the crown attaching it with a silver jump ring. I closed the itty bitty accordion card using a clip and to make it more feminine I tied white and rose red ribbons on the clip.
Here is what it looks like laid out as the accordion card. Unfortunately I don't have a nice mantel or bookshelf to display it on but I worked with what I had using my craft table. It turned out pretty good for my first try!

Thanks for taking a look. It's great to be crafting and blogging again!
Tuesday, October 20, 2009
Addition to my family
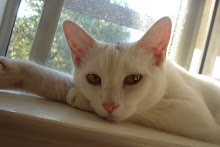
I adopted a kitten on September 26th, her name is Luna and she was 4 months old. She is a domestic short hair and is white almost all over her body except for the splash of gray on top of her head. Her eyes are the most beautiful golden color, one of the things that attracted her to me when I first saw her at Pet Smart.
This is my first time owning a cat, we grew up with dogs because my dad is allergic to cats. After being around my friends cats the last few years I've grown to like them and see that they do have personalities of their own and can be affectionate like dogs, just in a different way.

One of her favorite games is for me to roll the ball into the paper bag and I say "get the ball". Instead of just going in the bag and getting the ball she walks around it and paws the sides and back of the bag before she jumps in to get the ball. It makes me laugh every time she does it!!


Since I moved out to the country to a cottage, this is the perfect environment for Luna to have birdie TV. All she has to do is look out the various windows and she sees many types of birds flying about. One of her favorite spots to look for birds in the morning is the bathroom window because she can get so close to them. In the afternoon the same window provides a great sunny place to take a nap, as seen in the picture below.

A great closeup of those gorgeous golden eyes.

Of course sleeping is a big part of her day too, she is a cat after all!

I can't believe I've only had Luna one month, it seems like I've had her for a few months at least. She is a sweetheart (most of the time!) and I am so glad that I adopted her.
Saturday, October 17, 2009
I'm back...
I haven't quite been myself these past few months. I've been going through some personal stuff and wasn't doing things I enjoyed such as reading, blogging, crafting, etc. I've come through the experiences with a better understanding of myself and am ready, once again, to start participating and enjoying life.
Today I actually started to make a mini accordion card for a girlfriends 40th birthday. I saw a few examples of one in a magazine a few months ago and have wanted to make one ever since. It's my first time making this type of card so it took a while for me to get started. I'll share my experience and pictures when I'm finished with the project, probably sometime in the next few days.
It feels good to be back.
Thursday, August 27, 2009
Card Making with Rose, Part 1
My friend Rose wanted to learn how to make stair step cards so I went to her house last Saturday to teach her. I brought a few stamp sets, punches, cs (including dsp) and ribbon for her to use.


Rose and her husband Larry had their own advertising business when they lived in the bay area years ago so I knew she would be very creative in card making.


Here are the components she used making her first card. She stamped and used partial punched pieces and parts of the stamped images. I had never seen this done before and I really like the idea.

Another great idea Rose had was to decorate the back side of the card as shown in the second photo below. Since the card is decorated in the back, no matter which angle you're looking at it from you always see the art work.

Rose stamped the top note die and added the one heart flower. I love the cards simplicity and cs color combination. It was great for me to observe Rose's creativity and to see what she did with it.


Go to Part 2 to see the second stair step card Rose made.
Card Making with Rose, Part 2
For the second stair step card Rose stamped the flower branches along the front and back of the second and third steps. She also cut dsp and used the lace border punch and then scored it so it undulated the steps. This is one of my favorite techniques that Rose did, she is great at thinking outside the box.


Roses stamping Buddy :o)

As with the first card Rose stamped the back sides of this stair step card too. I love fleur de lis.

On the front of the first step she used one petal of the 5 petal punch to make the indentations, attached dsp and stamped Thank You on the dsp. I love the way this card flows, the components all come together at the last step. Great job Rose!

Here is how it looks coming out of the envelope.

Here are the 2 stair step cards Rose made, I love both of them!!

Rose wants me to teach her more card techniques so stay tuned for pictures in the future.
Wednesday, August 19, 2009
My Craft Space - Before and After
I moved to a cottage in Coarsegold in July and figured I'd had enough weight lifting looking through boxes and bins for craft stuff. I was making cards on the small living room table and it was driving me crazy. Here is a before picture of how my craft area looked...

Today I'm starting to look through my 4 boxes of craft stuff, sorting it and deciding how I want to store it in this space. To get extra storage space, I stacked two wine boxes horizontally I got from Mel. I put them on an end table which also has a shelf on the bottom for me to use. The smaller wine box on the left hand side of the craft table has small shelves to put "things" on, small containers of buttons, brads, etc. which will be easy to reach.
I am a visual person so the more I can see the more ideas I get and my creative juices start flowing.


Below the picture is a blue bin on wheels which has some of the first stamps I bought when I started making cards. I'm going to look through these stamps to see which ones I haven't used and will give them away to my crafting girlfriends. The 3 drawer wicker chest is great for storage of my craft stuff and printer paper and inks.

This final picture shows the desk where I sit at my computer. It's right below a window that looks out to the countryside. If the window is open I can hear various birds and critters in the trees and bushes scurrying about. Nice sounds of the country.

Once I get my craft stuff sorted and put away I'll take a few more pictures to share.
Wednesday, August 5, 2009
Bay Area Trip July 2009
When I went to the bay area I was having such a great time visiting with everyone I didn't take as many pictures as usual. I decided to group what pictures I did take into 3 collages.
The first collage I titled "Papa's Garden in Belvedere". Their backyard looks out onto the Belvedere lagoon where people canoe, sail and swim. My dad loves to garden and when they moved here a few years ago he created a few different gardening areas in their backyard. I love the flower in the middle, it looks like a star burst. The flags hanging off the porch in the backyard are Norwegian and Danish, part of his ancestry.
We lived in Belvedere up on the island 1970 to 1975, when I was 12 to 17 years old. Those 5 years were the longest time we stayed in one place, we moved around alot. This area holds alot of good memories for me, it's where alot of "firsts" happened, first kiss, first love, learned to drive, first serious boyfriend, etc. So when I visit my parents I often think about the time we lived here and smile.
Kris Werner, a friend from my freshman year at Redwood HS found me on Facebook. When I go to the bay area at the end of this month we're going to get together and reminisce, though her memory is alot better than mine. She's going to bring Redwood HS yearbooks, mine got lost in the many moves. Talk about a blast from the past!

This collage I call "People and Places in the Bay Area". I visited a few times with Darcy and 3 month old Ruby in Redwood City, what a precious gift she is. When I visited with Melanie in the East Bay we went to Caspers Hot Dogs http://www.caspershotdogs.com/ . I'd heard of them from a friend here in Coarsegold so I had to go. We went to the one in Hayward and I'm eating a Kraut dog, it was really good! My last visit was with Jerrold, we met at his place in SF and went out to our favorite Italian restaurant we found about a year ago. It's called Paradise Pizza & Pasta http://paradisepizzaandpasta.com/ and they have THE best pizza!!

My last collage is titled "Canine's and Feline's of the Bay Area". Friends and family are a big part of my life but so are friends dogs and cats. The yellow lab is Buffy and I've known her since she a puppy, we go way back. Every time I visit Gerri and Dennis in MP she starts wagging her tail when she sees me. It's amazing to me that she remembers me and my voice, even when it's been over a year since I last saw her.
The top picture is of Jerrold and his precious Tess, he got her from the pound when she was 11 months old and she's now almost 11 years old. Tess has moved with Jerrold alot over the last decade and she's been a great companion to him.
Mila is the black dog and Brian and Divina got him from the pound too. Her prize possession is the tennis ball which she is either playing with by herself or waiting for me to get off the computer so I can throw the ball for her. The picture of Mila in the upper right hand corner is when she's spotted a reflection of light on the ceiling or the wall. She's so funny, she stops dead in her tracks to looks to see where the light is moving and then she'll run after it. It's too funny for words!!

Subscribe to:
Posts (Atom)